Page Sections
Introduction
In Klarity, Reservation commitment visibility is available only for AWS instances and not for other cloud providers.
In AWS, the price for a Reserved Instance (RI) or a Savings Plan (SP) is less than the price for the same amount of on-demand usage. This is because you are making a financial commitment for either 1 or 3 years.
Why view RIs and SPs?
In Klarity, the Reserved Instances and Savings Plan view lists every RI/SP currently available in your organization's customer accounts.
In addition, Reservation commitment shows you:
- The time split between those times covered by RIs, SPs, or both, and those times you pay for on-demand.
- The cost difference between instances covered by RIs, SPs, or both and instances that you pay for on-demand.
- Suggestions on how to optimize your costs using RIs, SPs, or both.
How to view RIs and SPs
To view your AWS Reservations and Commitments, go to the left menu, hover over Reservations & Commitments, and click AWS.

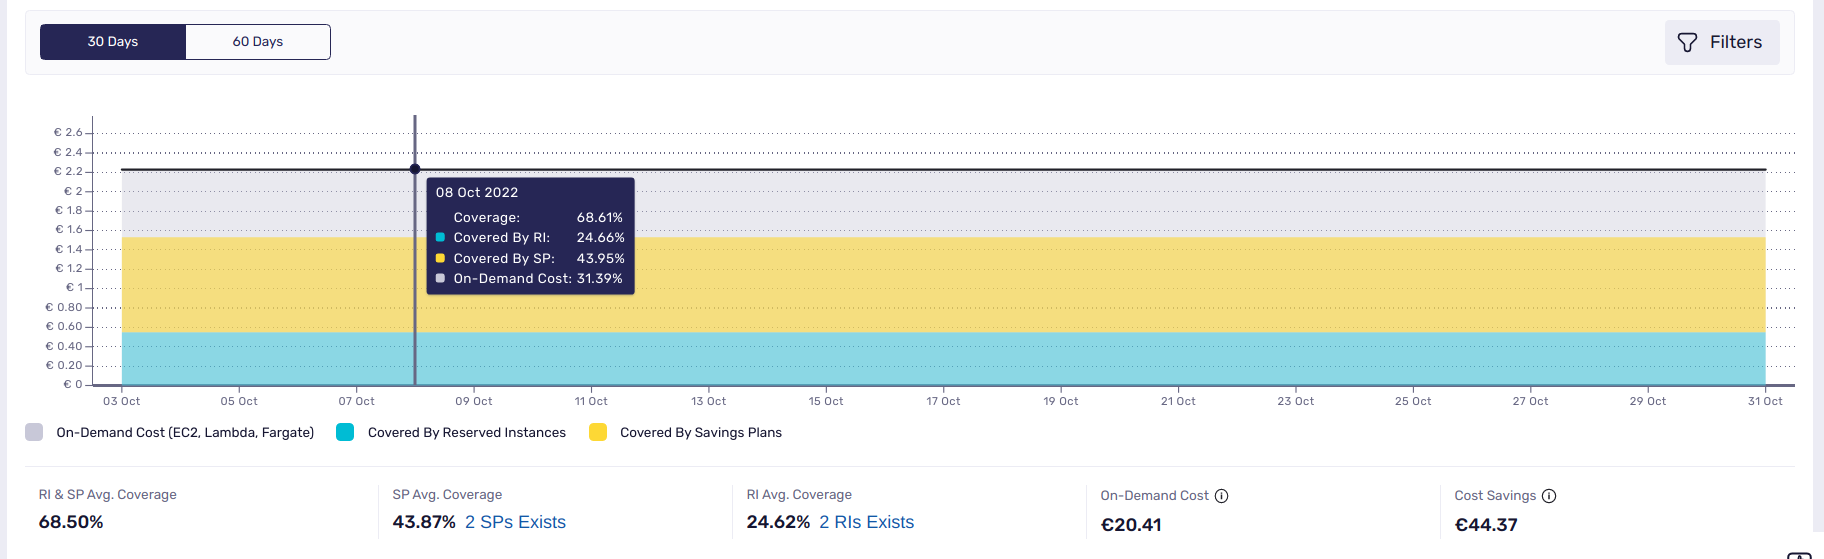
In Reservation commitment, the dashboards give you an overview of the following:
The Reserved chart presents information about:
- On-Demand Cost(gray),
- Covered By Reserved Instances(blue),
- Covered By Savings Plans(yellow).
Below the graph is information about:
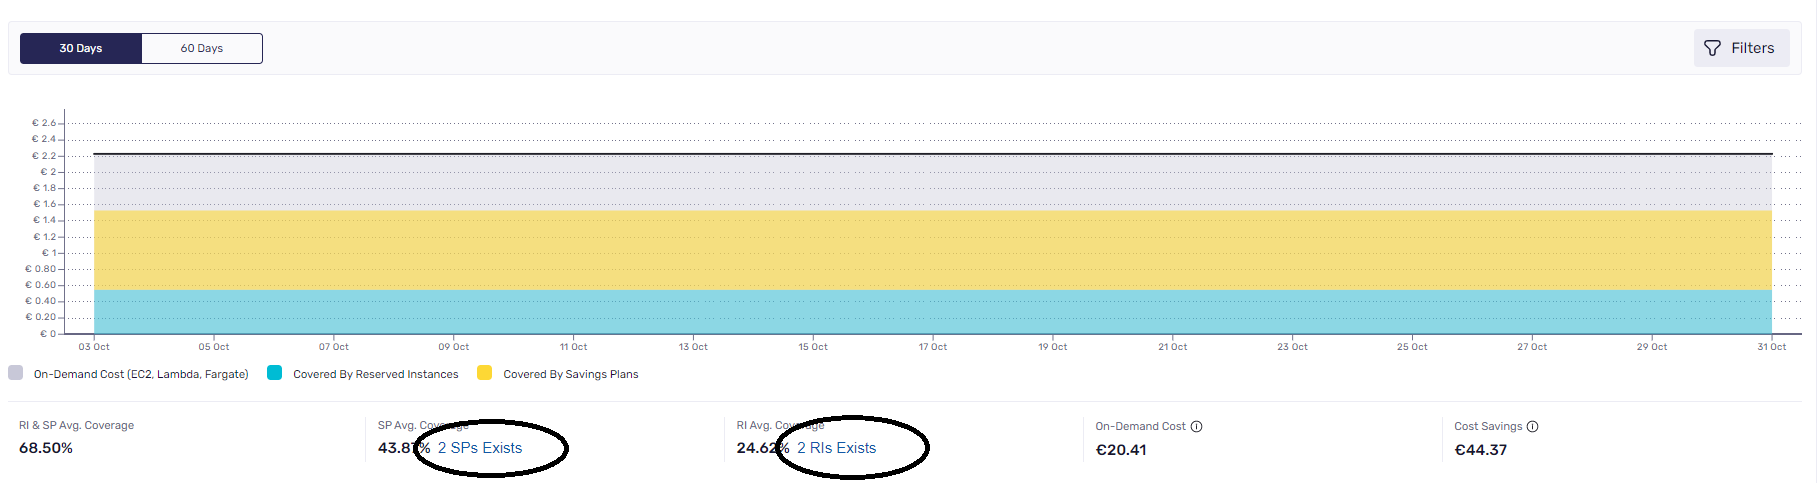
- RI & SP Avg. Coverage (sum of RI Avg. Coverage and SP Avg. Coverage percentage)
- SP Avg. Coverage (SP Covered Hours / ( SP Covered Hours + On-Demand Hours), as %)
- RI Avg. Coverage (RI Covered Hours / ( RI Covered Hours + On-Demand Hours), as %)
- On-Demand cost (the total equivalent cost of on-demand usage)
- Cost Savings (the total savings)
The above values depend on two clickable buttons - 30 days and 60 days. Therefore, values under the chart are calculated according to which button is pressed.
RI/SP exists
To see the Estate Record Details, which have RI/SP, go to Menu, click Reservations Commitments, and click the hyperlink under the SP Avg. Coverage / RI Avg. Coverage (depending on which one you click first).
In the Instance Type title, for each RI/SP, you see the following:
- Savings Plan / Instance Details (depending on which one you click first)
- Purchase Option
- Total Utilization
- Expiration Date
You can also select the Term at one or three years and the payment option; All Upfront, Partial Upfront, and No Upfront views.

When clicking either the Reserved Instances Recommendations or the Compute Savings Plan Recommendation box, the details at the bottom reflect what is connected to the headings.
Reserved Instances Recommendations will display the following:
- Instance details
- Coverage Details
- On-Demand Cost
- Cost Savings
- Potential Savings
- Recommendations
In recommendations, you will see "Check Recommendations" if Klarity suggests these.
Recommendations Settings
Klarity will show you the potential savings on all your instances in the recommendations settings. You can view the "Terms" at one-year or three-year savings. You can also view the "Payment Option" for "All Upfront," "Partial Upfront," and "No Upfront." These show different savings whether you pay in advance or not.

Reserved Instances and Compute Savings Plan Recommendations automatically update when you click on any tabs.
Inside the "Reserved Instances Recommendations" and "Compute Savings Plan Recommendations" boxes, you can see the following headings:
- Potential Monthly Saving (How much you could save in one month)
- Potential Yearly Saving (How much you could save in one year)
- Saving Rate (The % of your saving rate, the longer the timeframe and higher upfront cost, the higher the %)
- Total Upfront Cost (How much you will pay upfront)
- Recurring Monthly Cost (How much you will pay each month)

Compute Savings Plan Commitments
This section shows the account number and how much you:
- Will pay (SP Commitment / Hour)
- Would have paid, on average, before savings recommendations (Avg. Cost / Hour)
- Will save after implementing the savings recommendations (Savings / Hour)

Usage Details
The final part of the savings recommendations is the usage details. This shows all your resources, whether they have savings recommendations or not. You can see the following sections:
- Instance Details (shows all the available resources)
- Coverage Details (shows the % coverage of SPs and RIs. The higher the coverage by either SP or RI, the more you can save)
- On-Demand Cost (how much you pay in on-demand costs)
- Cost Savings (how much you are saving)
- Potential Savings (how much you can save)
There is also a Recommendations section.
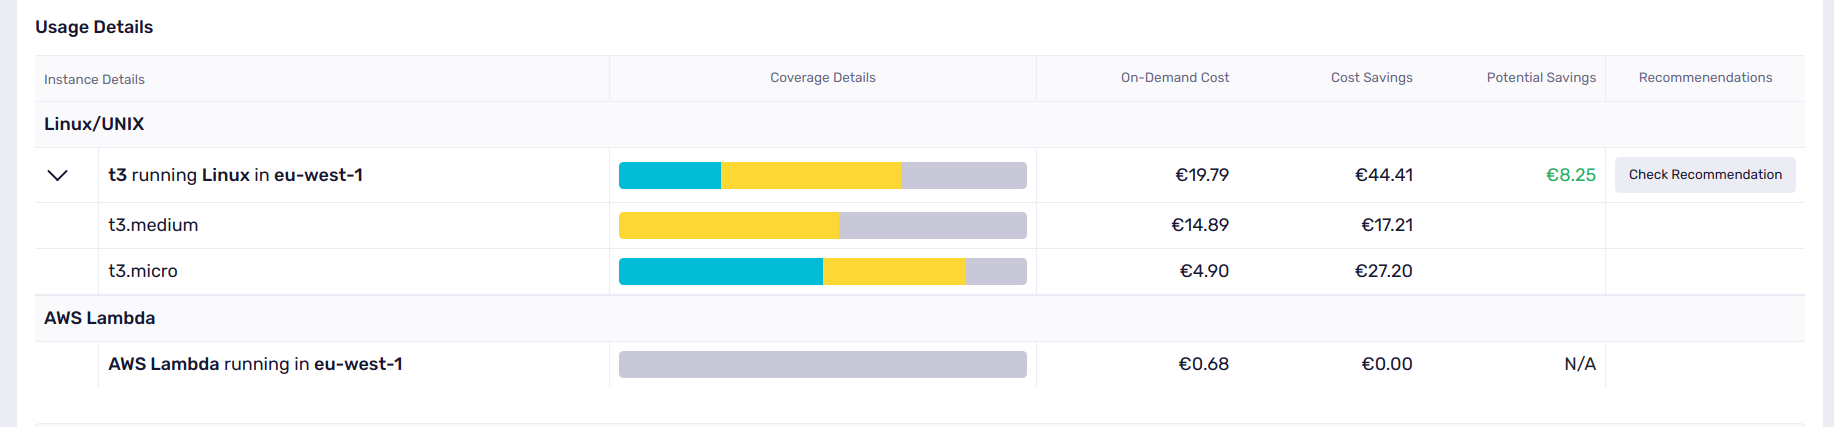
If Potential Savings has a figure (green), that means that Klarity has some suggestions. Next to the figure, click "Check Recommendation" to view Klarity's recommendations. Under "Recommendations Options," you can click on the "Terms" and "Payment Option" buttons. When clicking an option, you will see that "Savings" and "Costs" modify accordingly.
Reserved Instance Purchase Recommendation is the suggestion Klarity gives users to purchase for their cloud account. Please note this is a suggestion only, and any purchasing is required to be done by the user.
Below that, there is a break-even chart. Here you can see the timeframe in months before you "break even." The black line will represent your costs if you don't receive any recommendations. The blue line represents your new costs if you agree to Klarity's advice. The longer the term and the more you pay upfront, the higher your savings.

For Database coverage tab options are the same like in Compute but grouping is different
- Aurora MySQL,
- Aurora PostgreSQL,
- MariaDB,
- MySQL,
- Oracle,
- PostgreSQL,
- SQL Server,
- Redshift,
- OpenSearch (Old ElasticSearch),
- Elasticache.
For MachineLearning coverage tab options are the same like in Compute but grouping is different
- Studio-Notebook
- Notebook
- Processing
- Data Wrangler
- Training
- Hosting
- BatchTransform
Filtering
Clicking the "Filters" button (on the right side of the chart in the Compute tab) opens a sidebar on the right side of the screen, which has the following options:
- Operation System - it is possible to filter only Windows, only Linux, or both Windows and Linux.
- Instance Family - it is possible to choose one or a few types of instance family.
- Region - it is possible to select one or a few region options.
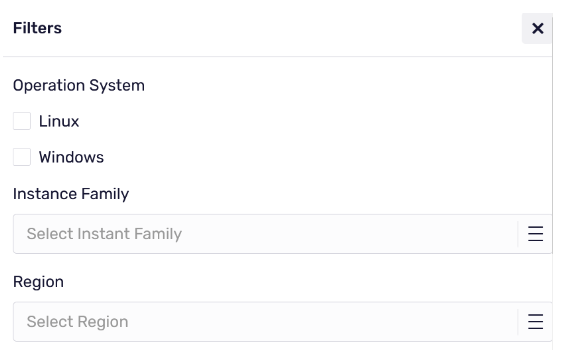
After applying settings, the Reservations Commitments page will reload, and all dates will be updated.
For Database filtering options also exist.
Note
- Klarity informs you about recommendations in every tab or by using banners - “There are no recommendations.” But in some cases, users won’t see any recommendations. Compute - The system looks at how the EC3, Lambda, and Fargate services have been used during a certain period and finds that no recommendations can be made. Savings Plan Recommendations are generated for customers with an average On-Demand spend of $0.10/hour during the lookback period (30 or 60 days). Database - The system looks at how RDS, Redshift, OpenSearch, or ElasticCache services have been used during a certain period and finds that no recommendations can be made. Machine Learning - The system looks at how Sagemaker machines or no machines have been used during a certain period and finds that no recommendations can be made. To see the Recommendations and “Reserved Instances,” & “Savings Plan” resources (in estate records), organizations must provide access to the AWS account where the RI and SP were purchased. If that AWS account is not onboarded to Klarity, no recommendations will be generated nor displayed →Onboarding Estates | Klarity User Guide
- To see the Recommendations and “Reserved Instances” & “Savings Plan” resources (in estate records), organizations must provide access to the AWS account where the RI and SP were purchased. If that AWS account is not onboarded to Klarity, no recommendations will be generated nor displayed.
- The “Reservations & Commitments” page will not be visible in the previous billing period. It will only be available on current billing period.
Correct billing period
Make sure that you choose the relevant billing period for your particular needs. Then, in Klarity, hover over either the Current Billing Period or Previous Billing Period to the top menu bar to select the correct billing period.
With 100% Utilization, the sum of instance benefits is equal to the sum of RI benefits for each previous billing period but not for the current billing period. For the current billing period, the sum of instance benefits may be greater than that of RI benefits because RI benefits are calculated for fully-billed days only. This is to avoid reporting 100% Utilization for an entire day based on data from less than a whole day because such utilization would need to be corrected later.
Edit this page on GitHub