Page Sections
To view your Azure Reservations, go to the left menu, hover over Reservations & Commitments, and click Azure.
Note
Before you can start using Reservations, you must first onboard the Azure Reservation Reader Role Access to Klarity using an Azure PowerShell Script at https://learn.microsoft.com/en-us/azure/cost-management-billing/reservations/view-reservations#assign-a-reservation-reader-role-at-the-tenant-level-using-azure-powershell-script. Once you have done this, Klarity will be able to display your existing Reserved Instances and Reservation Estate Record
Reservations and Commitments allow you to track how many hours you have used each resource over the past 30 days. Each reservation has a specific set of resources to which it applies. For example, if you used a VM for 4 hours on a particular day, you would be charged for 4 hours at the hourly rate for that VM. If you used that VM for less time the next day, you would pay less. This is known as pay-as-you-go or on-demand pricing.
Azure and other cloud providers offer another pricing option in addition to on-demand pricing because it can be difficult to predict how many resources you will need. Often, you will end up paying for more resources than you actually use.
This is where reservations come in. When you purchase a reservation, you pay less than the on-demand price for the same resources. This is why reservations are such a popular option for cloud users. Reservations are available in one- and three-year terms, and you can choose to pay in full upfront or monthly. Again, this option is much less expensive than on-demand pricing.
Storage
The chart below shows your monthly storage spend. The gray line represents your total spend for the current month, while the blue area represents the cost of dedicated instances and the gray area represents the cost of on-demand. You can view this chart for the last 30 or 60 days.
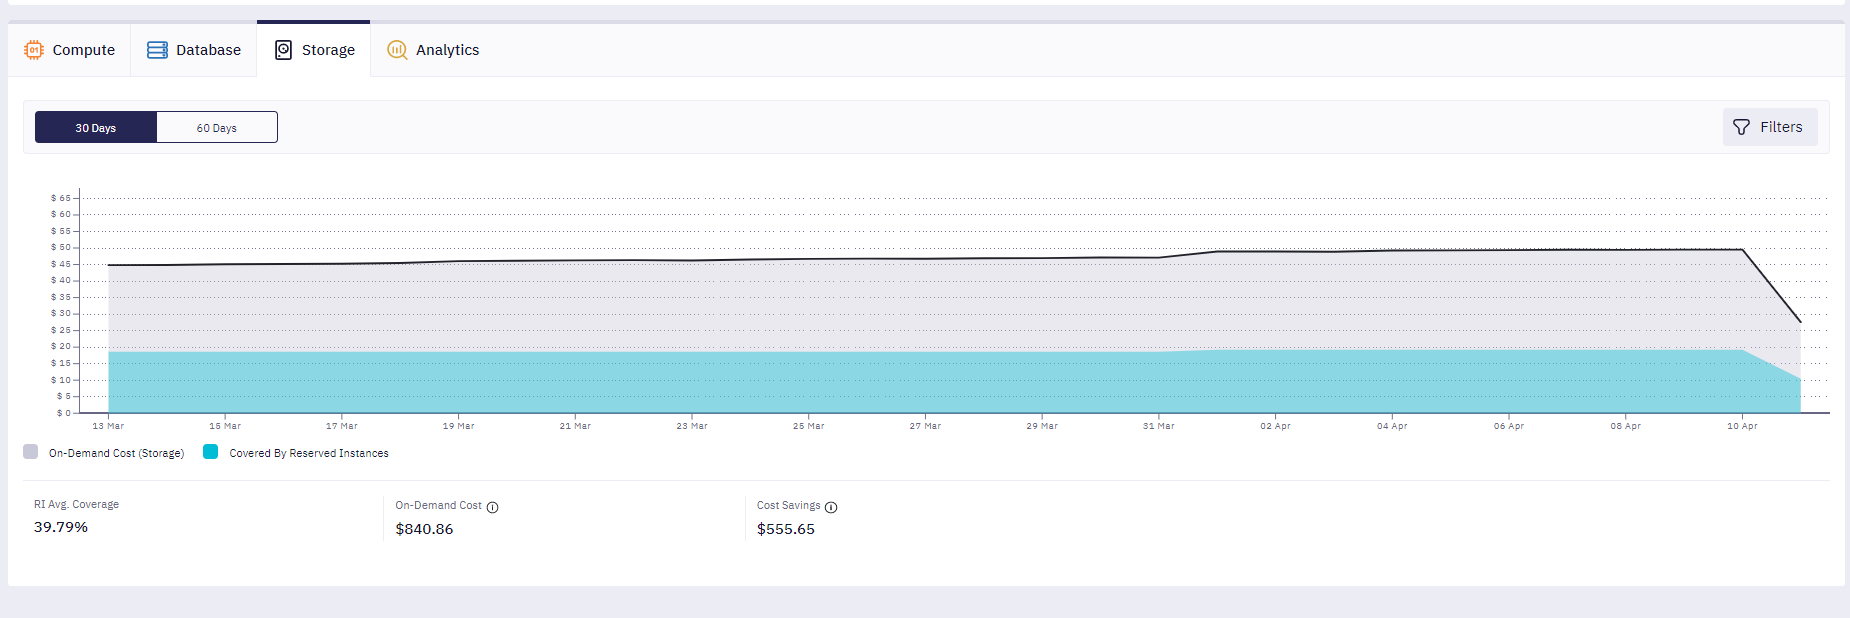
Below the chart, you will see three figures:
- RI Avg. Coverage: This is the average coverage of Reserved Instances compared to on-demand usage.
- On-Demand Cost: This is the total cost of on-demand usage.
- Cost Savings: This is the amount you have saved by using Reserved Instances.
Next to the "RI Avg. Coverage" figure, you will see a link to "RIs Exist" if you currently have Reserved Instances. Clicking this link displays a menu bar on the right with information about your Reserved Instances.
In the menu bar, you will see a list of your existing reserved instances with the following headings:
- Tier And Redundancy Details: Tells you the type of RI you have purchased.
- Purchase Option: Indicates the length of the reservation plan, along with the full upfront or monthly cost.
- End date: Indicates the date your RI expires.
Recommendations Settings
Klarity will show you the potential savings on all your instances in the recommendation settings. You can view the "Terms" for one year or three years of savings. You can also view the "Payment Option" for "All Upfront" and "Monthly". These show different savings depending on whether you pay upfront or not.Klarity will show you the potential savings on all your instances in the recommendation settings. You can view the "Terms" for one year or three years of savings. You can also view the "Payment Option" for "All Upfront" and "Monthly". These show different savings depending on whether you pay upfront or not.

The Reserved Instances recommendations automatically update when you click on any of the "Terms" and "Payment Options".
Inside the "Reserved Instances Recommendations" box, you can see the following headings:
- Potential Monthly Saving - how much you could save in one month.
- Potential Yearly Saving - how much you could save in one year.
- Saving Rate - the % of your savings rate, the longer the timeframe and the higher the upfront cost, the higher the %.
- Total Upfront Cost - how much you will pay upfront.
- Recurring Monthly Cost - how much you will pay each month.

Usage Details
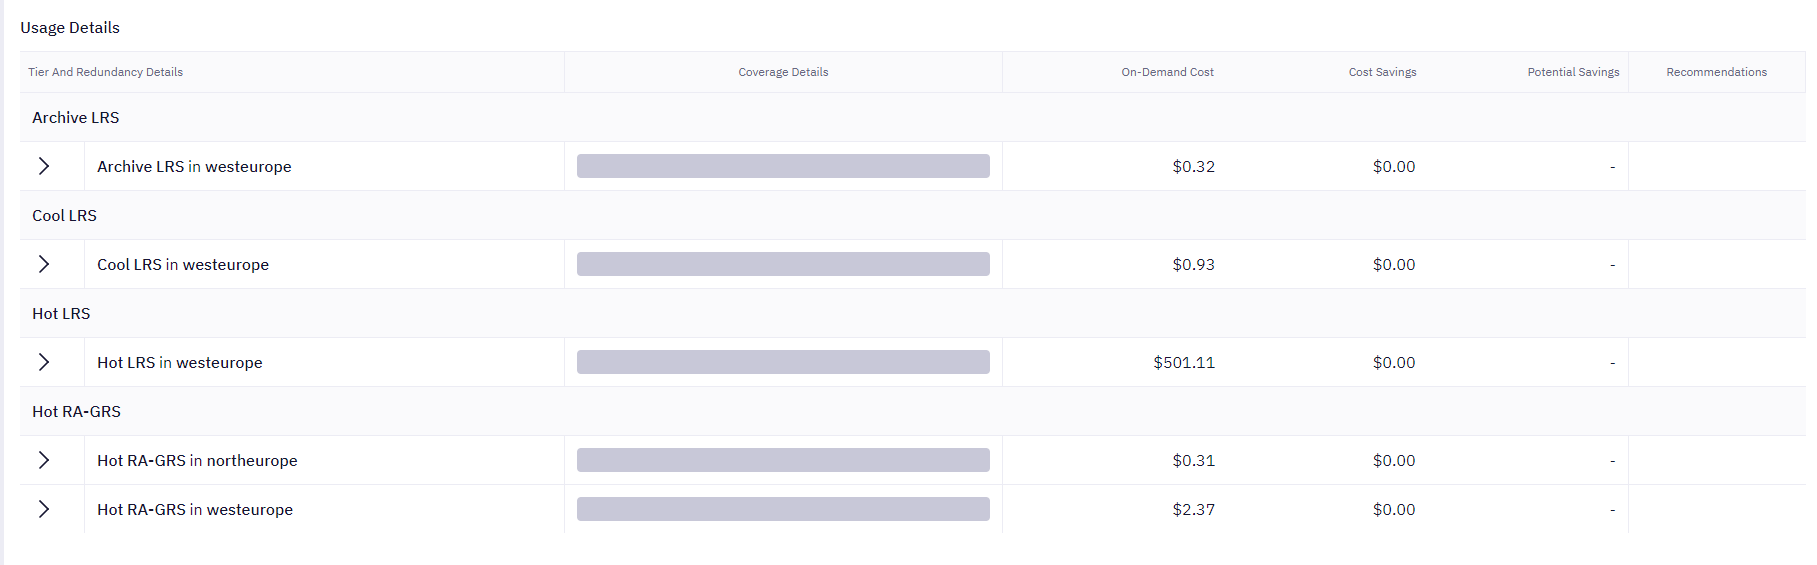
The last part of the Savings Recommendations is the Usage Details. This shows all your resources, whether they have savings recommendations or not. You will see the following sections:
- Tier And Redundancy Details - shows all available resources.
- Coverage Details - shows the % coverage of SPs and RIs. The higher the coverage of either SP or RI, the more you can save.
- On-Demand Cost - shows how much you are paying in On-Demand Costs.
- Cost Savings - shows how much you are saving.
- Potential Savings - shows how much you can save.
- Recommendations
There is also a Recommendations section.
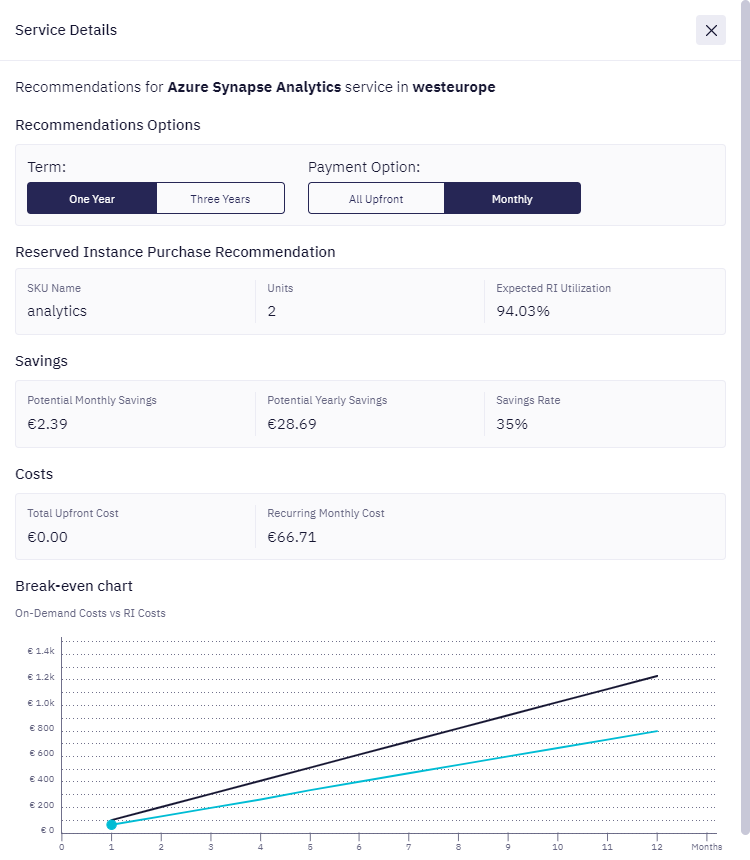
If Potential Savings has a figure (green), it means Klarity has some suggestions. Next to the figure, click "Check Recommendation" to see Klarity's recommendations. Under "Recommendation Options" you can click on the "Terms" and "Payment Option" buttons. When you click on an option, you will see the "Savings" and "Cost" change accordingly.
Reserved Instance Purchase Recommendation is the suggestion Klarity gives users to purchase for their cloud account. Please note that this is only a suggestion and any purchase must be made by the user.
Below is a break-even chart. Here you can see the time frame in months before you break even. The black line represents your cost if you don't take Klarity's advice. The blue line represents your new cost if you follow Klarity's advice. The longer the term and the more you pay up front, the greater your savings.

Note
If Klarity can't find any recommendation details for selected "Term" and "PaymentOption". Then Klarity showing banners - "For this term and payment option the system couldn't find any recommendations".
Filtering
Clicking the “Filter” button (on the right side of the diagram in the Storage tab) opens a sidebar on the right side of the screen with the following options:
- Tier And Redundancy Option - it is possible to select one or several types of tier and redundancy options.
- Region - it is possible to select one or several region options.

After applying the settings, the Reservation Commitments page will reload and all the data will be updated.
Analytics
If you look at the chart below, the gray line tells you how much you've spent on analytics for the current month. The blue area is the reserved instances, and the gray area is the on-demand cost. Finally, you can view the chart at 30 or 60 days.
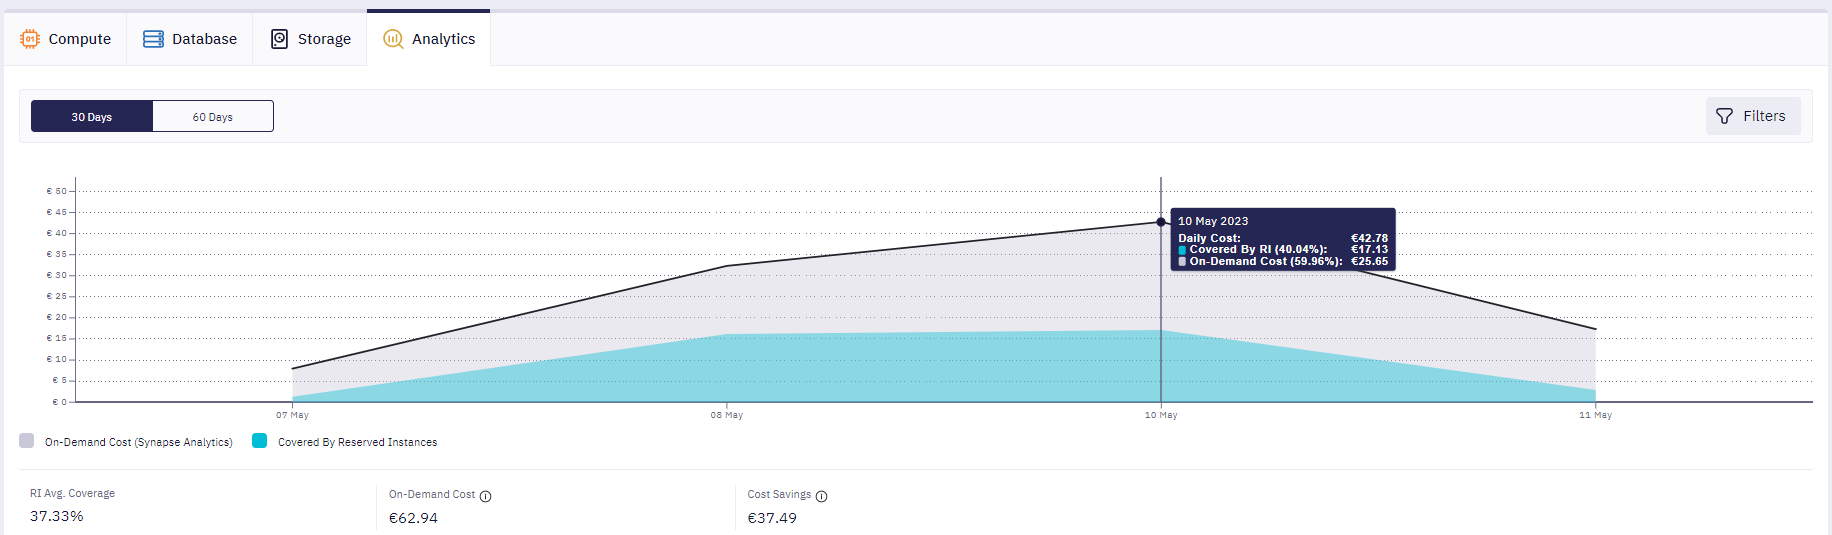
Below the chart are three figures:
- RI Avg. Coverage: This is the total average of RIs vs. on-demand usage.
- On-Demand Cost: This is the total on-demand cost.
- Cost Savings: This is how much you have saved using RIs.
Next to RI Avg. Coverage, you will see if there are any current RIs in a link form # RIs Exist. When clicking on the link, a menu bar will appear on the right showing you information about the RIs.
You will see a list of existing RIs with the following headings:
- Service Details: Tells you the type of RI you purchased.
- Purchase Option: The length of the plan, with full upfront or monthly costs.
- End date: The RI expiration date.
Recommendations Settings
Klarity will show you the potential savings on all your instances in the recommendations settings. You can view the "Terms" for one year or three years of savings. You can also view the "Payment Option" for "All Upfront" and "Monthly". These show different savings depending on whether you pay upfront or not.
The Reserved Instances recommendations automatically update when you click on any of the "Terms" and "Payment Options".
Inside the "Reserved Instances Recommendations" box, you can see the following headings:
- Potential Monthly Saving - How much you could save in one month.
- Potential Yearly Saving - How much you could save in one year.
- Saving Rate - The % of your saving rate, the longer the timeframe and higher upfront cost, the higher the %.
- Total Upfront Cost - How much you will pay upfront.
- Recurring Monthly Cost - how much you will pay each month.
Usage Details

The last part of the savings recommendations is the Usage Details. This shows all your resources, whether they have savings recommendations or not. You will see the following sections:
- Service Details - shows all available resources.
- Coverage Details - shows the % coverage of SPs and RIs. The higher the coverage of either SP or RI, the more you can save.
- On-Demand Cost - how much you are paying in On-Demand Costs.
- Cost Savings - how much you are saving.
- Potential Savings - how much you can save.
- Recommendations
There is also a Recommendations section.
If Potential Savings has a figure (green), it means Klarity has some suggestions. Next to the figure, click "Check Recommendation" to see Klarity's recommendations. Under "Recommendation Options" you can click on the "Terms" and "Payment Option" buttons. When you click on an option, you will see the "Savings" and "Cost" change accordingly.
Reserved Instance Purchase Recommendation is the suggestion Klarity gives users to purchase for their cloud account. Please note this is a suggestion only, and any purchasing is required to be done by the user.
Below that, there is a break-even chart. Here you can see the timeframe in months before you "break even." The black line will represent your costs if you don't receive any recommendations. The blue line represents your new costs if you agree to Klarity's advice. The longer the term and the more you pay upfront, the higher your savings.
Note
If Klarity can't find any recommendation details for selected "Term" and "PaymentOption". Then Klarity showing banners - "For this term and payment option the system couldn't find any recommendations".
Filtering
Clicking the “Filter” button (on the right side of the diagram in the Storage tab) opens a sidebar on the right side of the screen with the following options:
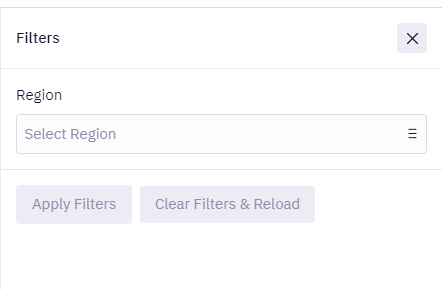
- Region - it is possible to select one or several region options.
After applying the settings, the Reservation Commitments page will reload and all the data will be updated.
Note
Klarity informs about recommendations in every tab or by banners - "There are no recommendations". But in some cases, users won't see any recommendations.
Storage: Based on the historical usage of the Storage Service during a specific period, the system collects usage data and finds no recommendations that can be made. Analytics: Based on the historical usage of Synapse Analytics during a specific period, the system collects usage data and finds no recommendations that can be made.
Discount cost from agreement between provider and user company are not included
Correct Billing Period
Make sure you select the appropriate billing period for your needs. Then, in Klarity, hover over either Current Billing Period or Previous Billing Period in the top menu bar to select the correct billing period.
Edit this page on GitHub